If you watched my github page, you know I like to integrate everything with the home automation platform home-assistant. Still, I find it really hard to make effective use of IoT devices in my home. Honestly speaking, I found exactly one practical use case of my WiFi-capable ceiling light, which is to turn on a few minutes before my phone alarm goes off.
Why should I care?
This might be a personal preference, but I feel being woken up by light is much more comfortable than by some alarm sound. However, this advantage is usually level out by the fact that setting up a light alarm and maintaining it is much more inconvenient than using the stock smartphone alarm. This is especially the case if you need to wake up at a different time each day.
What’s the idea?
The default Android Alarm app displays a notification, roughly 15-20 minutes before an upcoming alarm goes off. The core idea is to use this notification as a trigger to turn on a light. This way, without any additional configuration, you just need to set an alarm on your phone and the DIY “light alarm” will adjust automatically.
This idea may be transferred to a variety of applications and lights. As an example, I include a short tutorial on how to turn on a light using the android stock alarm app, the automation app Automate and Home-Assistant. The app Tasker might work just as well.
Checking for the Clock Notification
After installing Automate, open the app and create a new Flow. If you are new to Automate, don’t worry, the interface is quite intuitive. Nontheless, feel free to first skim to some tutorial for the tool.
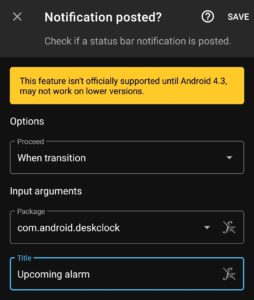
In order to use the stock alarm app as trigger, add the Block Notification posted. As input, we choose the stock android alarm app, its identifier is “com.android.deskclock”. In order not to turn the light on for other notifications (for example Timer notifications), we filter for notifications with the title “Upcoming alarm”. Note that this block triggers quite frequently, most of the time taking the NO branch. So be sure to connect the NO branch back to the IN branch of the notification block.
Depending on taste, this block may be run all the time, or for example only in the morning hours. This can be customized by putting a Time window block between the start block and the notification check.
In any case we want to do two things after the correct notification has been posted: First, we need to turn on our light. This will work via a HTTP Request to our home-assistant instance. Secondly, we need to continue to check for new notifications. We establish this with a Fork block. Adding all required block so far, your flow should look like the one depicted here.
Turning on the light
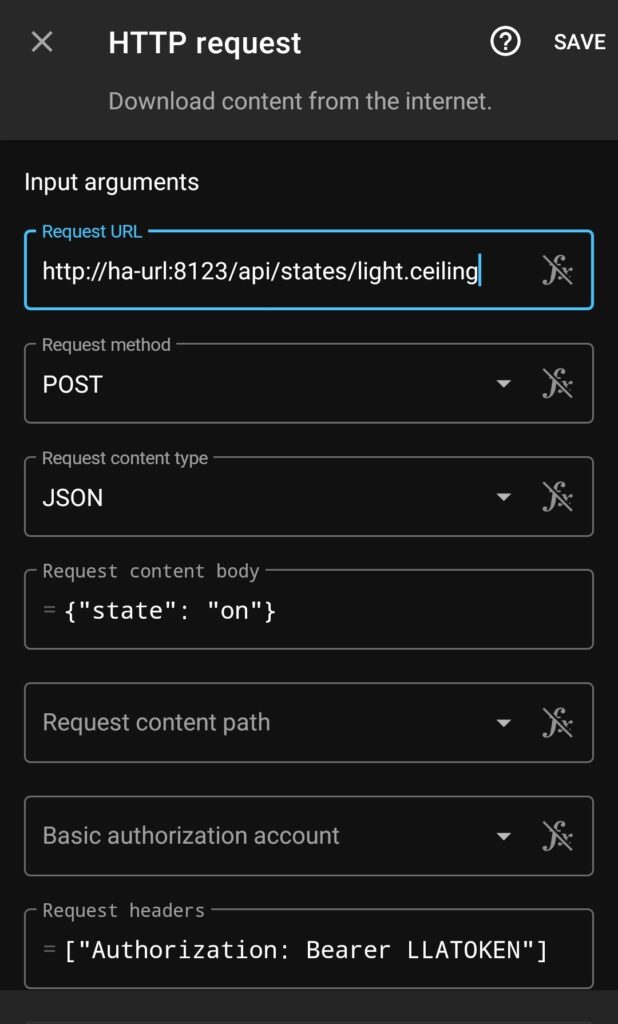
Home-Assistant provides us with a REST API per default. You need to follow the instructions described here to create a Long Lived Access token, which we will use to authenticate ourselves in our requests. Using the API, we can interact with every entity registered at Home-Assistant via opening a website (HTTP-Requests). The particular entity we are interested in is the light we would like to turn on. Mine will be simply called “ceiling”, resulting in the Home Assistant identifier “light.ceiling”.
The resulting configuration for the Automate Block “HTTP Request” can be seen here. If you are using self-signed certificates for your local home assistant instance, you may want to check “Trust insecure certificates”.
This concludes the setup. If there are any issues with the resulting flow, make sure to check the Automate log for errors (for example the Clock notification detection simply have not worked). I am also glad for any comments on how to improve this basic setup and tutorial.


