
While mobile data is crucial for every trip in South East Asia, finding the best eSIM can be hard. Especially for Cambodia, which is not included in many regional data plans and outrageously expensive in common providers such as Revolut, Klook or BNE-Sim (1 GB ~ $6). CellCard is a local provider that is easy to set up and cheap (15 GB ~ $6). However, a few hurdles remain, which I detail in this post.
Cambodia is a curious country for eSIMs. It is not included in many regional packages1 and even in usually-pricey-but-okay providers such as BNE or Saily you’ll pay at least $10 for a few GB2. However, there is a small, appearently very local provider of SIM cards that recently started providing eSIMs: CellCard.
CellCard eSIMs require a one-off payment of $4 to get a phone number/eSIM, and then get your started for as little as $1.5 for the 15GB plan (and $10 for 100GB). The remainder of this blog post will explain how to obtain and install an eSIM using this provider. Please be aware that this reflects the situation at the time of writing and may have changed when you read this.
Obtaining a CellCard eSIM
To get started, download the CellCard App from your phones app-store: https://www.cellcard.com.kh/en/my-cellcard. Inside the App, choose your language and navigate through “Buy eSIM” > “Let’s start” > “Choose a Phone Number” > “Choose your plan” to the payment. If you are confused about choosing a phone number (as I was): I think this is an Asian culture thing, similar to obtaining high-valued, special number plates, there is an appeal in “special” numbers. The cheapest numbers cost $4 and should be fine, we anyways only want mobile data, right? This is the base one-off setup fee.


After completing the payment on the next step, you’ll receive the details of your SIM card via Telegram, which you’ll need to install. Unfortunaly, most tutorials I found online skipped this step or lacked a crucial step so I’ll detail below how the installation can be done.
Installing the eSIM
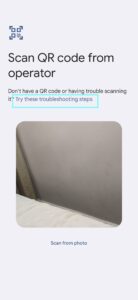
The eSIM you’ll receive has a weird format which my Google Pixel would not accept directly. You can try the normal eSIM procedure, but I could not get the phone to recognize the QR code and was at a loss on how to insert the obtained SM-DP+ address and the activation code into the single SIM code field my settings expect.
To install the eSIM, open your phones settings and navigate to SIMs > Add SIM > Set up an eSIM > Try these troubleshooting steps > Enter it manually. Now, from the SM-DP+ address you received, and the activation code, form the following eSIM code:3
LDA:1$<smdp-address>$<activation code>The constructed code for this example was as follows:
# Example
LDA:1$thales1.prod.ondemandconnectivity.com$3C923ABCDEFABCDEF
Or, as a more graphical guide, below:


That’s it. You should now be able to use your new eSIM and enjoy 15+GB of data! Any trouble during the setup? Let me know in the comments!
References:
- The top result on Klook for “Cambodia e-SIM” is in fact a 4 country e-SIM that does not include Cambodia. The rest is either physical SIM or not Cambodia. ↩︎
- I checked this price comparison website for an overview. ↩︎
- I actually had no idea how to do this and bought another SIM card. After data there ran out I retried my luck, googled around a lot and finally asked ChatGPT for the solution – which it one-shotted. LLMs have a use case after all! With the hint, I found this more extensive explanation by ByteSim (i.e. the solution was not hallucinated!!). ↩︎
can i get a e sim with a old number of my
Good question, but I don’t know. You get to the screen where you can choose a phone number before you have to pay anything though, so it might be worth to just try it.